
Simple Data Binding
Simple data binding involves the read-only selection lists. These controls can bind to an array list or fields from a database. Selection lists takes two values from the database or the data source; one value is displayed by the list and the other is considered as the value corresponding to the display.
Let us take up a small example to understand the concept. Create a web site with a bulleted list and a SqlDataSource control on it. Configure the data source control to retrieve two values from your database (we use the same DotNetReferences table as in the previous chapter).
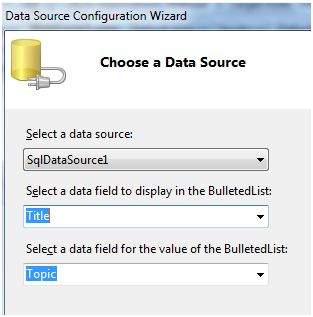
Choosing a data source for the bulleted list control involves:
- Selecting the data source control
- Selecting a field to display, which is called the data field
- Selecting a field for the value
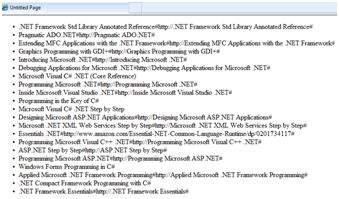
When the application is executed, check that the entire title column is bound to the bulleted list and displayed.
Declarative Data Binding
We have already used declarative data binding in the previous tutorial using GridView control. The other composite data bound controls capable of displaying and manipulating data in a tabular manner are the DetailsView, FormView, and RecordList control.
In the next tutorial, we will look into the technology for handling database, i.e, ADO.NET.
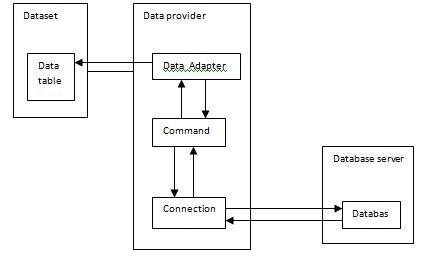
However, the data binding involves the following objects:
- A dataset that stores the data retrieved from the database.
- The data provider, which retrieves data from the database by using a command over a connection.
- The data adapter that issues the select statement stored in the command object; it is also capable of update the data in a database by issuing Insert, Delete, and Update statements.
Relation between the data binding objects:
Example
Let us take the following steps:
Step (1) : Create a new website. Add a class named booklist by right clicking on the solution name in the Solution Explorer and choosing the item 'Class' from the 'Add Item' dialog box. Name it as booklist.cs.
using System;
using System.Data;
using System.Configuration;
using System.Linq;

using System.Web;
using System.Web.Security;
using System.Web.UI;
using System.Web.UI.HtmlControls;
using System.Web.UI.WebControls;
using System.Web.UI.WebControls.WebParts;

using System.Xml.Linq;

namespace databinding
{
   public class booklist
   {
      protected String bookname;
      protected String authorname;
      public booklist(String bname, String aname)
      {
         this.bookname = bname;
         this.authorname = aname;

      }

      public String Book
      {
         get
         {
            return this.bookname;
         }
         set
         {
            this.bookname = value;
         }
      }

      public String Author
      {
         get
         {
            return this.authorname;
         }
         set
         {
            this.authorname = value;
         }
      }
   }
}
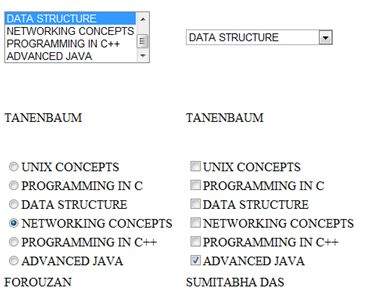
Step (2) : Add four list controls on the page a list box control, a radio button list, a check box list, and a drop down list and four labels along with these list controls. The page should look like this in design view:
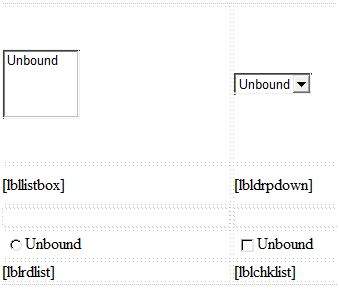
The source file should look as the following:
<form id="form1" runat="server">
   <div>

      <table style="width: 559px">
         <tr>
            <td style="width: 228px; height: 157px;">
               <asp:ListBox ID="ListBox1" runat="server" AutoPostBack="True"
                  OnSelectedIndexChanged="ListBox1_SelectedIndexChanged">
               </asp:ListBox>
            </td>

            <td style="height: 157px">
               <asp:DropDownList ID="DropDownList1" runat="server"
                  AutoPostBack="True" OnSelectedIndexChanged="DropDownList1_SelectedIndexChanged">
               </asp:DropDownList>
            </td>
         </tr>

         <tr>
            <td style="width: 228px; height: 40px;">
               <asp:Label ID="lbllistbox" runat="server"></asp:Label>
            </td>

            <td style="height: 40px">
               <asp:Label ID="lbldrpdown" runat="server">
               </asp:Label>
            </td>
         </tr>

         <tr>
            <td style="width: 228px; height: 21px">
            </td>

            <td style="height: 21px">
            </td>
         </tr>

         <tr>
            <td style="width: 228px; height: 21px">
               <asp:RadioButtonList ID="RadioButtonList1" runat="server"
                  AutoPostBack="True"  OnSelectedIndexChanged="RadioButtonList1_SelectedIndexChanged">
               </asp:RadioButtonList>
            </td>

            <td style="height: 21px">
               <asp:CheckBoxList ID="CheckBoxList1" runat="server"
                  AutoPostBack="True" OnSelectedIndexChanged="CheckBoxList1_SelectedIndexChanged">
               </asp:CheckBoxList>
            </td>
         </tr>

         <tr>
            <td style="width: 228px; height: 21px">
               <asp:Label ID="lblrdlist" runat="server">
               </asp:Label>
            </td>

            <td style="height: 21px">
               <asp:Label ID="lblchklist" runat="server">
               </asp:Label>
            </td>
         </tr>
      </table>

   </div>
</form>
Step (3) : Finally, write the following code behind routines of the application:
public partial class _Default : System.Web.UI.Page
{
   protected void Page_Load(object sender, EventArgs e)
   {
      IList bklist = createbooklist();

      if (!this.IsPostBack)
      {
         this.ListBox1.DataSource = bklist;
         this.ListBox1.DataTextField = "Book";
         this.ListBox1.DataValueField = "Author";

         this.DropDownList1.DataSource = bklist;
         this.DropDownList1.DataTextField = "Book";
         this.DropDownList1.DataValueField = "Author";

         this.RadioButtonList1.DataSource = bklist;
         this.RadioButtonList1.DataTextField = "Book";
         this.RadioButtonList1.DataValueField = "Author";

         this.CheckBoxList1.DataSource = bklist;
         this.CheckBoxList1.DataTextField = "Book";
         this.CheckBoxList1.DataValueField = "Author";

         this.DataBind();
      }
   }

   protected IList createbooklist()
   {
      ArrayList allbooks = new ArrayList();
      booklist bl;

      bl = new booklist("UNIX CONCEPTS", "SUMITABHA DAS");
      allbooks.Add(bl);

      bl = new booklist("PROGRAMMING IN C", "RICHI KERNIGHAN");
      allbooks.Add(bl);

      bl = new booklist("DATA STRUCTURE", "TANENBAUM");
      allbooks.Add(bl);

      bl = new booklist("NETWORKING CONCEPTS", "FOROUZAN");
      allbooks.Add(bl);

      bl = new booklist("PROGRAMMING IN C++", "B. STROUSTROUP");
      allbooks.Add(bl);

      bl = new booklist("ADVANCED JAVA", "SUMITABHA DAS");
      allbooks.Add(bl);

      return allbooks;
   }

   protected void ListBox1_SelectedIndexChanged(object sender, EventArgs e)
   {
      this.lbllistbox.Text = this.ListBox1.SelectedValue;
   }

   protected void DropDownList1_SelectedIndexChanged(object sender, EventArgs e)
   {
      this.lbldrpdown.Text = this.DropDownList1.SelectedValue;
   }

   protected void RadioButtonList1_SelectedIndexChanged(object sender, EventArgs e)
   {
      this.lblrdlist.Text = this.RadioButtonList1.SelectedValue;
   }

   protected void CheckBoxList1_SelectedIndexChanged(object sender, EventArgs e)
   {
      this.lblchklist.Text = this.CheckBoxList1.SelectedValue;
   }
}
Observe the following:
- The booklist class has two properties: bookname and authorname.
- The createbooklist method is a user defined method that creates an array of booklist objects named allbooks.
- The Page_Load event handler ensures that a list of books is created. The list is of IList type, which implements the IEnumerable interface and capable of being bound to the list controls. The page load event handler binds the IList object 'bklist' with the list controls. The bookname property is to be displayed and the authorname property is considered as the value.
- When the page is run, if the user selects a book, its name is selected and displayed by the list controls whereas the corresponding labels display the author name, which is the corresponding value for the selected index of the list control.


No comments:
Post a Comment